Get The Best Recipes in 2025

How to Make Roasted Canned Corn on the Stove
Discover how to make roasted canned corn on the stove for a delicious, fire-roasted flavor. Quick, easy, and packed with taste—perfect for any meal!
Table of Contents
ADVERTISEMENT
ADVERTISEMENT
When it comes to simple yet delicious meals, few things are as versatile as roasted canned corn. This underrated ingredient, when cooked right, transforms into a savory treat that’s both quick and flavorful. Whether you’re preparing a snack, adding a side dish to your meal, or looking for a topping for tacos, roasted canned corn is a foolproof option. Here, you’ll discover how to take canned corn to the next level with a few easy steps on the stove, using ingredients you likely already have in your kitchen.
Why Roast Canned Corn on the Stove?
Quick & Easy
Time is often of the essence, especially on busy weeknights or when you’re cooking for a family. Roasting canned corn on the stove is incredibly fast. Unlike oven-roasting, which can take up to 30 minutes, this method can be done in less than 15 minutes. So, if you need something delicious in a pinch, the stove method is a lifesaver.
Flavorful Transformation
Canned corn has a reputation for being bland, but roasting it on the stove completely changes its profile. The high heat caramelizes the sugars in the corn, bringing out a deep, savory sweetness. As the corn crisps and browns, it adds a layer of texture that’s both crispy and tender. This transformation creates a flavor-packed bite that is far more satisfying than simply heating canned corn.
Versatile
Roasted canned corn is versatile – you can season it however you like. Whether you’re craving something savory, spicy, or tangy, you can easily adjust the seasoning to suit your preferences. Plus, it works well as a side dish, snack, or topping for all types of dishes.
Ingredients You’ll Need for Roasted Canned Corn
To make roasted canned corn on the stove, you’ll only need a handful of simple ingredients. Here’s what you’ll need:
- 1 can of whole corn (about 14 ounces or 2 cups frozen corn)
- 1 tsp olive oil (Chili-infused olive oil adds extra flavor)
- Seasonings (garlic salt, seasoned salt, chili powder, Tajín, etc.)
- 1/2 lime (Juice of half a lime adds a refreshing zing)
These ingredients provide the perfect balance of flavor and texture. You can customize them further with your favorite seasonings, but this basic combination is the ideal starting point.
Tips for Choosing the Best Canned Corn
When selecting canned corn, opt for a product with minimal additives. Low-sodium or no-salt-added versions are best, allowing you to control the flavor. If you prefer a fresher taste, feel free to substitute frozen corn for canned corn. Frozen corn, when thawed, works perfectly for roasting, and it tends to have a slightly sweeter flavor.
Step-by-Step Guide to Making Roasted Canned Corn on the Stove
Now that you have your ingredients, let’s dive into the step-by-step process of creating roasted canned corn. It’s simple, fast, and produces mouthwatering results.
Step 1: Heat the Oil in a Skillet
Start by heating your olive oil in a large skillet on high heat. Olive oil is perfect because it has a high smoking point, which means it can handle the heat needed to achieve that beautiful crispy texture on the corn. If you want to add an extra layer of flavor, use chili-infused olive oil. The spicy notes from the oil will complement the sweetness of the corn perfectly.
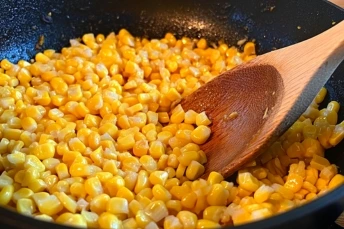
Step 2: Add and Roast the Corn
Once your oil is heated, add your drained (or thawed) corn into the skillet. Spread it evenly so the kernels are in a single layer. This is crucial because it allows each kernel to come into direct contact with the hot skillet, promoting even browning.
At this point, resist the urge to stir the corn. Let it sit in the pan for a few minutes to allow the kernels to brown and crisp up. The key here is patience—this initial browning stage is essential for getting that perfect roasted texture.
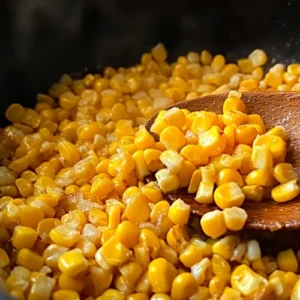
Step 3: Season to Taste
After the corn has had a few minutes to brown, it’s time to season it. This is where you can get creative. You can sprinkle garlic salt, seasoned salt, chili powder, or even Tajín, depending on your preferences. If you want a spicy kick, go heavy on the chili powder or add a dash of cayenne. For something more savory, garlic salt and seasoned salt will bring out the best in the corn.
Stir the corn gently to ensure the seasoning is evenly distributed. Keep in mind that it’s important to let the corn continue to roast as it cooks. You want the seasoning to meld into the kernels while ensuring the corn stays crispy and browned.
Step 4: Finish and Serve
After 7 to 10 minutes of roasting, your corn should be golden brown with crispy edges. It’s now ready to be removed from the heat. To finish, squeeze fresh lime juice over the top of the corn. The tangy lime balances out the richness of the oil and the earthiness of the seasoning, giving the dish an extra burst of flavor.
Let the roasted corn cool for a couple of minutes in the skillet, and then it’s ready to serve. You can enjoy it right away or store it in the fridge for later.
What to Serve with Roasted Canned Corn
Roasted canned corn isn’t just a side dish on its own. It pairs perfectly with a variety of meals. Here are a few ideas for how to incorporate this roasted treat into your meals:
Taco Night
Roasted corn makes an excellent topping for tacos. The crispy, flavorful corn pairs beautifully with seasoned meats like chicken, beef, or shrimp. Add it to your tacos along with other toppings like avocado, cilantro, or sour cream for a delicious, fully loaded bite.
Salads
Corn adds a nice texture to salads. Roasted corn is especially wonderful when combined with greens, tomatoes, and beans. Toss it into a fresh salad for an extra layer of flavor that will make your salad stand out.
Grilled Meats
Roasted corn pairs beautifully with grilled meats like steak, chicken, or fish. The combination of the smoky, caramelized corn and the savory grilled meat is mouthwatering. Serve it as a side dish or alongside a protein for a complete meal.
How to Store and Reheat Leftover Roasted Canned Corn
If you have leftovers, don’t worry! Roasted canned corn can be stored for later use.
Storing
Allow the roasted corn to cool completely before transferring it to an airtight container. Keep it in the refrigerator for up to three days. The corn will maintain its taste and texture for a limited time, so it’s best to eat it within a few days.
Reheating
To reheat, simply place the corn back in a skillet over medium heat for about 5 minutes, stirring occasionally to prevent burning. If you’re in a rush, you can microwave it for a quicker option. Just be sure to stir it occasionally so that it heats evenly.
Frequently Asked Questions (FAQs)
Can I use frozen corn instead of canned corn?
Absolutely! Frozen corn works just as well as canned corn in this recipe. Just make sure to thaw the corn before using it in the skillet. Frozen corn tends to have a sweeter flavor, so it’s a great alternative if you want a slightly different taste.
What other seasonings can I use for roasted canned corn?
The beauty of roasted corn is how easily you can customize the flavor. Try adding cumin, smoked paprika, or even grated cheese for a different twist. You can also experiment with herbs like cilantro or parsley for a fresh, herby note.
How can I make this recipe spicier?
For those who love heat, there are plenty of ways to spice things up. Add cayenne pepper, chili powder, or even diced jalapeños during the roasting process. The longer the corn sits in the skillet, the more the heat will infuse into the kernels.
Can I make this dish ahead of time?
Yes! Roasted canned corn can be made ahead of time and stored in the fridge. Just reheat it when you’re ready to serve, either on the stove or in the microwave.
Conclusion
Roasting canned corn on the stove is an easy, flavorful way to elevate an everyday ingredient. In just a few simple steps, you can transform canned corn into a crispy, caramelized delight that can be served as a side dish, topping, or snack. With endless seasoning options and a quick cooking time, this recipe is one you’ll want to keep in your repertoire for busy nights or whenever you crave something simple but tasty. So, why not give it a try today? Your taste buds will thank you!
ADVERTISEMENT
ADVERTISEMENT
How to Make Roasted Canned Corn on the Stove
Discover how to make roasted canned corn on the stove for a delicious, fire-roasted flavor. Quick, easy, and packed with taste—perfect for any meal!
Ingredients
- 1 can whole corn about 14 ounces or 2 cups frozen
- 1 tsp olive oil i used chili infused
- garlic salt seasoned salt, chili powder tajin, etc
- 1/2 lime juice of
Instructions
- Heat oil in skillet on high heat. Add drained (or thawed) corn. Spread evenly and leave it alone so that it can start to turn brown.
- Sprinkle with any or all of the seasonings to taste. Stir to mix and continue to let the corn roast. Stir occasionally so that it doesn’t burn. Should take close to 10 minutes.
- Remove from heat and let it cool in the skillet. Use warm or store in refrigerator until needed.